
IA Project Prompt 1: Gray Matter Sparks (Light & the Mind)
- Corrina Crazie Espinosa
- Jan 13
- 15 min read


wit
Project 1: Gray Matter Sparks (Light & the Mind)
Conceptual Umbrella: Psychology, dreams, consciousness, ideas, thought, inner states
Key Themes: light as thought, illumination and obscurity, attention, memory, imagination, dreams and waking states, fragile, flickering interior worlds
Technical Focus: LEDs and light control, Interaction through buttons, switches, or simple sensors, Basic circuits and soldering, Containment and enclosure (box-making).
Imagine: thought becoming visible
life flickering on
mind as material
pinning a dream to the wall
Challenge (Optional): Feeling ambitious? Explore expanded light systems such as RGB LEDs, LED strips, or multi-LED arrays that can be physically embedded into your concept.
Final Deliverable: An interactive artwork that uses light and containment to visualize or evoke a psychological or dreamlike state.
✔ One interactive light-based artwork
✔ Embedded circuit (prototype or resolved)
✔ Documentation (photos + short video)
✔ 300 word artist statement
Artist Inspiration:

Mel & Dorothy Tanner (Lumonics)
Pioneers of Light as Sculptural Medium (Colorado)
Mel and Dorothy Tanner were Colorado-based artists who worked collaboratively from the 1960s through the 1990s, becoming early pioneers in the use of light as a primary sculptural material. Long before LEDs, microcontrollers, or digital interactivity were common tools, the Tanners treated light not as illumination or decoration, but as form, structure, and spatial experience.
Their work incorporated fluorescent tubes, neon, industrial lighting components, and custom-built electrical systems, often arranged in precise geometric configurations. Rather than hiding the technology, they embraced its material presence, allowing wiring, fixtures, and structural logic to remain visible as part of the sculpture.
Light as a system, not an effect
What makes the Tanners especially relevant to contemporary interactive art is their systems-based approach. Their sculptures are carefully balanced arrangements of:
power
material
structure
space
perception
The work changes depending on where the viewer stands, how they move, and how light activates the surrounding environment. While their pieces are not interactive in the sensor-driven sense we will aim to use in this class, they are deeply experiential and embodied — the viewer’s body and perception complete the work.

Historical importance
The Tanners’ practice sits at an important intersection between:
Light and Space art
Minimalist sculpture
Early techno-material experimentation
They demonstrate that light-based, systems-oriented art was already being developed outside major art centers and well before the rise of digital tools. Their work reminds us that contemporary interactive art builds on a much longer lineage of artists thinking critically about energy, perception, and environment.
Living legacy in Denver
Today, the Tanner legacy continues through my friends Marc Billard and Barry Raphael, two surviving members of the Tanner team who actively preserve, exhibit, and maintain the work while fostering its ongoing presence in Denver. Their stewardship emphasizes that light art is not only about invention, but also about maintenance, care, and continuity — values that resonate strongly with contemporary media art practices.
“Mel and Dorothy Tanner were building light-based systems decades before microcontrollers — proving that interaction can happen through perception, not just sensors.”

James Turrell
Light as Material, Space, and Perception
James Turrell is a contemporary artist whose practice centers entirely on light itself as the primary medium. Rather than using light to illuminate objects, Turrell uses light to construct space, alter perception, and make viewers acutely aware of how they see.
Associated with the Light and Space movement of the late 1960s and 1970s, Turrell’s work emerged alongside artists interested in perception, phenomenology, and the embodied experience of art. His work is not about representation or imagery — it is about direct experience.
How Turrell uses light
Carefully controlled artificial and natural light
Hidden light sources that eliminate visible fixtures
Architectural environments designed specifically to hold light
Color, intensity, and duration used as sculptural elements
In works such as Ganzfeld installations, Skyspaces, and Roden Crater, light appears:
solid
spatial
immersive
sometimes disorienting
Edges dissolve, depth becomes ambiguous, and the boundary between object and environment collapses.

Interactivity without electronics
Turrell’s work is deeply interactive, but not in a sensor-based or technological sense.
The interaction happens through:
the viewer’s movement through space
the adaptation of the eyes over time
shifts in attention, orientation, and perception
The artwork responds because you are present.
This makes Turrell an important counterpoint to interactive works that rely on buttons, sensors, or code. He demonstrates that perception itself is an interface.
Light as a system
Although Turrell’s work often feels mystical or meditative, it is grounded in rigorous systems thinking:
precise control of light intensity and color
strict spatial constraints
carefully engineered environments
long durations that allow perception to change
Nothing is accidental. The experience is the result of controlled variables operating within a closed system.
Why Turrell matters for interactive art
He proves that interaction does not require technology
He foregrounds the viewer’s body as part of the system
He encourages patience, attention, and awareness
He expands the definition of “input” to include movement, time, and perception
For artists learning electronics and physical computing, Turrell provides a crucial reminder:

Technology is not the point — experience is.
“James Turrell doesn’t use light to show you something. He uses light to show you how to see.”

Vezzini & Chen
Cristina Vezzini (ceramics) & Stan Chen (glass)
Who they are
Vezzini & Chen is a contemporary artist duo based in London, formed by Cristina Vezzini and Stan Chen. They met while on the Royal College of Art MA program and have built a collaborative practice that brings together hand-crafted ceramics and blown glass into unified sculptural lighting forms and installations.
Cristina Vezzini specializes in finely crafted ceramics
Stan Chen is an accomplished glassblower
They work fluidly across both materials, often collaborating on each piece rather than splitting roles strictly by discipline.
What they make
Vezzini & Chen’s work is known for:
Sculptural lighting objects
Handcrafted, organic forms
Ceramics and blown glass used together so that light and material interact physically (light passes through, reflects off, and is modulated by surfaces and textures)
Their light works range from pendants and chandeliers to wall installations, often with evocative names such as Wildflower Meadow, Seed Pods, and By-the-Wind-Sailor Light.

How they use light as a medium
Material + Light Dialogue
Vezzini & Chen are not simply making “lamps” — their pieces are sculptures that come alive with light. Ceramics and glass each have translucent qualities:
Porcelain diffuses light softly
Glass can transmit, reflect, or refract light depending on shape and texture
They use these inherent material properties to shape the experience of light and shadow in space. This creates:
atmospheric effects
subtle mood shifts
dynamic visual interest as the light interacts with carved surfaces, contours, and the surrounding environment.
Nature-based inspiration
Their work draws inspiration from natural forms — seeds, water, organic growth — and how light acts in nature (for example, how light filters through water). This aesthetic choice reinforces the sensory experience of light, rather than emphasizing technology per se.
Where their work sits in the art + design landscape
Their pieces tread a fine line between functional object and sculptural art — both decorative and conceptual.
While not explicitly interactive in the sensor-based sense, the sculptures respond perceptually to viewer presence, light, and space — making them excellent examples of emergent interactivity through material and form.
Exhibitions and commissions include custom installations for hospitality, public art, and luxury interiors, showing how light sculpture can function in both artistic and design contexts.
Their work embodies light as material, which is conceptually close to interactive light art.
They show how surface, texture, and form shape light experiences.
They help expand thinking about where light art lives, beyond screens and LEDs into craft, perception, and spatial experience.

Jen Lewin
Interactive Light, Play, and Public Space
Jen Lewin is a contemporary artist and designer known internationally for creating large-scale interactive light installations, often placed in public spaces. Her work uses custom electronics, sensors, and LEDs to invite audiences to activate light through movement, touch, and play.
She is especially well known for projects like The Pool, Light Walk, and Aqueous, where stepping, jumping, or moving through space triggers responsive patterns of light.
How she uses light
LEDs embedded in floors or sculptural forms
Sensors detect pressure, proximity, or movement
Light responds immediately to human presence
Individual actions ripple outward, affecting the whole system
This makes her work:
highly intuitive
welcoming to non-art audiences
physically embodied
People don’t need instructions — they just move.

Conceptual importance
Lewin’s work emphasizes:
play as a form of participation
collective interaction (one person affects another’s experience)
light as a social connector, not just a visual effect
She often speaks about creating spaces where strangers briefly interact, collaborate, or notice one another — using light as the catalyst.
Clear input → process → output logic
Excellent use of sensor-based interactivity
Scales from small concepts to large public works
Makes interactive art feel approachable, not intimidating
“Jen Lewin’s work shows how simple interactions can create shared experiences — light becomes a social system.”
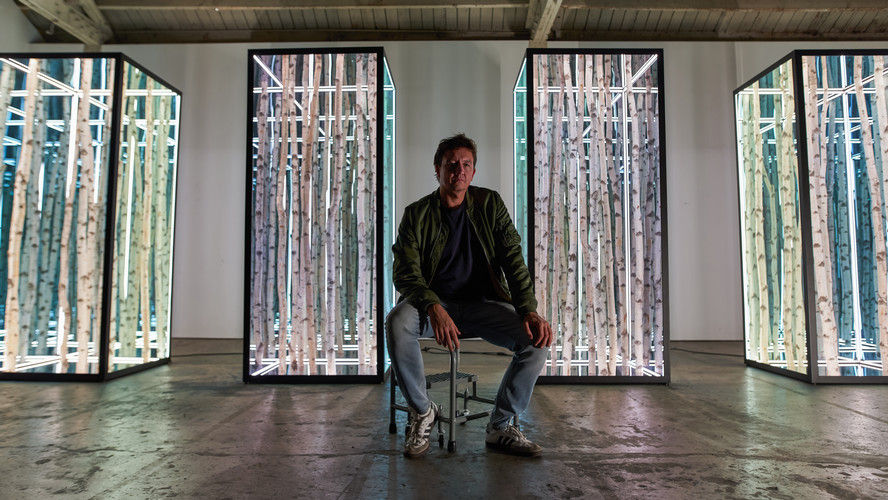
Anthony James
Light, Illusion, and Infinite Space
Anthony James is a contemporary artist best known for his large-scale light sculptures that use LEDs, mirrors, and precise fabrication to create the illusion of infinite depth and space. His work often takes the form of geometric portals, doors, or apertures that appear to open into endless luminous interiors.
Rather than relying on sensors or audience-triggered interaction, James’s work is experiential and perceptual. The interaction happens through vision, proximity, and movement—as viewers shift their position, the illusion of infinite space subtly changes.
How he uses light
LEDs as a controlled, structural light source
Mirrors to multiply and extend light infinitely
Enclosed sculptural forms that frame light as an architectural element
Light in James’s work is not expressive or gestural—it is precise, engineered, and disciplined, reinforcing the idea of light as a constructed system.
Light as system + illusion
James’s practice is deeply systems-oriented:
Small numbers of LEDs are used strategically
Optical logic (reflection, repetition) does the heavy lifting
Complexity emerges from simple, repeatable rules
This makes his work an excellent example of:
doing more with less
leveraging physics instead of computation
designing for perception rather than responsiveness

The “infinity” is not magic—it’s a carefully designed system.
Why his work is relevant
Shows that interactive experience doesn’t always require inputs
Reinforces ideas of:
repetition
arrays
reflection
constraint
demonstrates how light art can be about illusion, not behavior
“Anthony James uses light and reflection to build impossible spaces—reminding us that interaction can happen entirely in the viewer’s perception.”
Mar Williams
Hacker Mentality, Systems Thinking, and Hybrid Intelligence (Denver-based)
Mar Williams is a Denver-based artist, organizer, and cultural instigator whose work and practice embody a deeply hybrid way of thinking—one that collapses the false divide between so-called “left brain” and “right brain” modes of intelligence. Mar operates comfortably at the intersection of art, technology, hacking culture, and community-building, approaching all of it with curiosity, rigor, humor, and care.
Mar is widely known for their work connected to DEF CON, one of the world’s largest and most influential hacking conferences, where they have contributed to projects that merge creative expression with technical experimentation. In these contexts, “hacking” is not about spectacle or novelty, but about understanding systems well enough to bend, rewire, subvert, or reimagine them.
That hacker mentality—learning how things work by taking them apart, refusing black boxes, valuing experimentation over polish—runs through Mar’s artistic practice as well as their approach to collaboration and space-making.
A practice rooted in systems, not silos
Mar’s work resists categorization. Rather than choosing between:
technical vs. expressive
analytical vs. intuitive
functional vs. poetic
they move fluidly across these modes, often within the same project. This makes their work a powerful example of integrated intelligence—where technical knowledge and artistic intuition reinforce one another instead of competing.
Mar’s practice treats systems—social, technological, cultural—as materials. Whether working with code, objects, environments, or people, they are attentive to:
how systems behave
where they fail
who they include or exclude
and how they might be redesigned
Cabal Gallery & shared history
Mar Williams Joshua Finley and I, along with a small group of cohorts of "co-conspirators" co-ran Cabal Gallery, a project space rooted in experimentation, DIY, as well as Queer, underground and punk culture that was rooted in trust, and community. Cabal functioned not just as a gallery, but as a testing ground—for ideas, collaborations, and ways of working that didn’t fit neatly into institutional or commercial models.
That shared history matters: Cabal wasn’t about branding or hierarchy. It was about making space for work that needed space.
Feral Gallery: a continuation, not a rebrand
Mar is the founder of Feral Gallery, a new Denver-based space that continues and sharpens this ethos. Feral is:
local
queer-centered
punk in spirit
intentionally supportive of Indigenous and marginalized voices
Feral Gallery is not neutral, and it’s not pretending to be. It’s a space built from values, not trends—one that understands that infrastructure is cultural work.
Mar, Josh, Amy and a group of artist friends will be collaborating again within this space, extending a long-standing creative relationship rooted in mutual respect, shared ethics, and a willingness to build things from the ground up.
Why Mar Williams matters (especially for students)
Mar’s practice demonstrates that:
you don’t have to choose between art and tech
“hacking” can be an ethical, creative, and community-oriented act
systems literacy is a form of empowerment
building spaces is as important as making objects
They model a way of being an artist that is adaptive, interdisciplinary, and deeply human—one that understands creativity as something that happens not just in studios, but in networks, collaborations, and acts of care.
A real takeaway line
“Mar Williams approaches art the way a hacker approaches a system: learn it deeply, question its assumptions, and remake it in ways that serve people.”
Systems & Interactivity
Before we talk about wires, code, or Arduino, we need to talk about systems.
A system is a set of parts that work together to produce behavior.
That’s it. No buzzwords required.
A system always has:
Inputs — information coming in
Processes — decisions or rules
Outputs — actions or responses
When any one part changes, the system behaves differently.
Interactivity = Systems + Response
An artwork becomes interactive when it can:

listen
decide
respond
In other words, when it behaves like a system.
A button press, a hand moving closer, a light level changing — these are inputs. The logic you design — whether simple or complex — is the process. The light turning on, changing color, blinking, or reacting is the output.
Interactivity isn’t about fancy technology — it’s about relationships between parts.
What This Means for the Course
Moving forward, we are not just “learning electronics.”
We are:
building systems
testing systems
refining systems
sometimes breaking systems (on purpose and accidentally)
Each project will ask you to think in terms of:
What information is coming in? What decisions are being made? How does the system respond?
The materials will change. The scale will change. The complexity will grow.
But the underlying structure stays the same.
Data goes in, a process happens, and a behavior happens.
A Reassuring Note
You do not need to understand everything at once.
Systems thinking develops through:
hands-on experimentation
trial and error
iteration
reflection
We’ll start simple and build from there.
“Electronics just makes systems visible.”

A Gentle Introduction to Electronics & Arduino
(for artists, beginners, and the curious)
Before we touch any wires, I want to say this clearly:
You do not need to understand it to make things work.
Electronics is something you learn by doing, not by memorizing. This post is just a quick orientation — a way to put names to things you’ll start recognizing as we build together.
Think of this as learning the vocabulary of a new material, not a test you’re expected to pass.

What Is a Circuit?
Image: simple LED + resistor + Arduino diagram
A circuit is just a closed loop that electricity can flow through. If the loop is complete, things turn on. If it’s broken, nothing happens.
That’s it. No magic.
Power, Ground, and Flow
Image: breadboard with labeled power rails
Power (5V) → where electricity comes from
Ground (GND) → where electricity returns
Current → how much electricity is flowing
Most beginner problems come down to:
missing ground
backwards components
loose wires
(Debugging is part of the process — and part of the art.)

LEDs: Light as Output
Image: LED polarity diagram (long leg / short leg)
An LED (Light Emitting Diode) is one of our main outputs.
A few things to know:
LEDs have polarity (direction matters)
They always need a resistor
They’re durable, cheap, and forgiving
We’ll start simple: on / off, single LEDs, small arrays. Complexity comes later.
Inputs: How Systems Listen
Images: button, toggle switch, potentiometer, light sensor
Interactive art happens when a system can respond.
Common inputs we’ll use:
Buttons — pressed / not pressed
Switches — on / off with memory
Knobs (potentiometers) — a range of values
Sensors — light, distance, touch, sound
Inputs turn human action or environmental change into data the system can respond to.
Digital vs. Analog
Image: simple comparison diagram
Digital = on / off
Analog = a range
You don’t need to love numbers to use analog inputs — just know they represent change.

Arduino: The Brain
Image: Arduino Uno + a few different board types
An Arduino is a small computer called a microcontroller. It reads inputs, makes decisions, and controls outputs.
There isn’t just one Arduino — there are many different boards, each designed for different situations:
small
wearable
powerful
simple
specialized
I’ll bring in my big box of Arduinos so you can see how varied they are. This is a reminder that there’s no single “correct” board — just tools suited to different ideas.
Code (Without Fear)
Image: Arduino IDE screenshot
Arduino code is technically based on C/C++, but you don’t need to be a programmer to use it.
Every Arduino sketch has two main parts:
void setup() {
  // runs once
}

void loop() {
  // runs forever
}
Conceptually:
setup() = preparation
loop() = behavior
Most interactive systems boil down to:
If something happens → do something else.
That’s it.
You Don’t Need to Know Everything
I want to emphasize this again:
You don’t need to understand every term, equation, or concept before you start building.
You’ll learn by:
plugging things in
breaking things
fixing things
asking questions
experimenting
Electronics is not about perfection — it’s about curiosity and patience.
What I’ll Bring to Class
Along with the vocabulary and examples, I’ll bring:
a wide variety of Arduino boards
LEDs, buttons, knobs, sensors
breadboards and wires
finished examples and messy prototypes
Seeing and touching real components matters. This is a hands-on material, just like clay, paper, or ink.
Final Thought
Electronics isn’t magic — it’s just systems making decisions about energy.
And like any artistic medium, you don’t have to master it to start making meaningful work.
If you want next, I can:
suggest specific images to drop under each section
tighten this further for a shorter blog version
add a one-paragraph bridge from this post to your first lab
or help you write a closing sentence that invites students into the process
This is a really strong tone for the beginning of the course — calm, empowering, and human.
Materials, Shopping & LEDs
A practical starting point for Interactive Light
As we move from inspiration into making, it’s time to talk a little bit about materials — what you’ll need, what you don’t need yet, and how to approach shopping without panic.
First, an important note:
You are not expected to buy everything at once.
In class, I’ll have a variety of kits, sensors, LEDs, and components available for you to experiment with during labs. Think of these as try-before-you-buy tools — a chance to test ideas, explore possibilities, and figure out what actually makes sense for your project before investing in specialty parts.
A Basic Starter Kit (Highly Recommended)
I strongly recommend that each student start with a very simple personal kit. This gives you autonomy outside of class and makes troubleshooting much easier.
At minimum, your starter kit should include:
1 Arduino board (Uno or similar is perfect)
1 Breadboard
Jumper wires (male–male, male–female)
Resistors (a small assortment: 220Ω, 330Ω, 1kΩ)
Basic LEDs (red, green, blue, white)
Buttons (momentary)
Switches (toggle / latching)
Potentiometers (knobs)
A couple of small motors (DC motors or servos)
This kit will carry you through multiple projects and form the backbone of your interactive light experiments.
During labs, you’ll be able to try:
sensors
specialty LEDs
LED strips
addressable lighting
unusual components
Once you know what your project actually needs, then it makes sense to purchase more specific parts.
Let’s Talk About LEDs (We’re Going Hard on Light)
Since this project centers on light as a medium, LEDs deserve special attention. Not all LEDs behave the same way, and choosing the right kind matters.
Below are the most common types you’ll encounter.
Basic Single-Color LEDs
Image: red/green/blue LEDs
One color per LED
Simple on/off behavior
Require a resistor
Extremely reliable and beginner-friendly
These are perfect for:
learning circuits
arrays
patterns
early prototypes
Flashing & Color-Changing LEDs
Image: slow-flash RGB LED
Contain tiny internal circuitry
Flash or cycle colors automatically
No code required for behavior
Still need a resistor
Great for:
quick visual feedback
playful effects
early experimentation
Less control, but very approachable.
RGB LEDs
Image: 4-pin RGB LED diagram
Combine red, green, and blue LEDs in one package
Allow color mixing
Require more pins and more thinking
Still manageable at beginner level
Good for:
expressive color work
learning how control expands complexity
LED Strips (Non-Addressable)
Image: basic LED strip
Groups of LEDs wired together
Often one color per strip
Bright and scalable
All LEDs behave the same way
Useful for:
architectural lighting
washes of color
larger forms
Addressable LED Strips (Individually Controlled)
Image: NeoPixel / addressable strip
Each LED can be controlled independently
Extremely powerful and expressive
More complex wiring and code
Higher power considerations
We will approach these later, once you’re comfortable with basics.
Big power comes with big responsibility.

LEDs, Resistance & Not Burning Things Out
Every LED needs current limiting — usually a resistor.
There is a saying in electronics communities--
"Don't let the magic smoke out!"
The basic equation:
R = (Vs − Vf) / I
Where:
Vs = supply voltage (Arduino = 5V)
Vf = LED forward voltage (depends on color)
I = current (usually 0.02A)
In practice, we often use:
220Ω or 330Ω resistors for safety
You don’t need to calculate this every time — tools exist.
LED Array Wizard (Very Helpful)
This online calculator helps you design LED arrays safely:
You can:
choose series or parallel layouts
calculate resistor values
visualize arrays
avoid accidental LED murder 🔥
Engineers use calculators. Artists absolutely can too.
Series, Parallel & Arrays (Quick Overview)
Series: LEDs in a chain, voltage shared
Parallel: LEDs side-by-side, same voltage
Array: a system combining multiple LEDs in patterns
Arrays are where light becomes sculptural and architectural — and where your projects will really start to take shape.
What Happens Next
We’ll end this lecture here — with light, systems, and possibilities.
In the next class, we’ll:
work in teams
build real LED circuits
experiment hands-on
make things blink, glow, and respond
By then, my supplies will have arrived, and we’ll move from talking about electronics to touching and using them.
Final Thought
Start simple. Stay curious. Build systems that make light behave in interesting ways.
You don’t need every part right now — just a place to begin.
Comments