
Datamosh
- Corrina Crazie Espinosa
- Feb 26, 2020
- 11 min read

Updated: Jan 31, 2024

Glitch Art and Video
Glitch art is the practice of creating intentional flaws in sound, image and other files (such as jpg, wav, etc) for creative purposes. Artists intentionally break the file just enough to achieve surprising and serendipitous aesthetic outcomes, but not too much so that the file is no longer functional enough to open/play. It's a delicate balance of corruption. Here is a link to the Museum of Glitch Aesthetics where you can find many examples of glitch art: https://www.glitchmuseum.com/

Jon Satrom, Nick Briz, Rosa Menkman and the Chicago Dirty New Media Scene
On September 29 thru October 3, 2010, Chicago played host to the first GLI.TC/H, a five-day conference in Chicago organized by Nick Briz, Evan Meaney, Rosa Menkman and Jon Satrom that included workshops, lectures, performances, installations and screenings. In November 2011, the second GLI.TC/H event traveled from Chicago to Amsterdam and lastly to Birmingham, UK. It included workshops, screenings, lectures, performance, panel discussions and a gallery show over the course of seven days at the three cities. There was another event in 2012, but from what I can tell that was the last one… for now!

Nick Briz
Nick Briz was born and raised in Miami, but currently resides in Chicago. He is a self proclaimed new-media artist, educator and organizer. He has published a website where he offers a workshop/lecture titled “the Glitch Codec Tutorial,” where he demonstrates how to create the "glitch codec" a hacked piece of software he uses to make intentional glitches. Learn more about Nick here:
Check out his glitch tutorial here:

Rosa Menkman
Rosa Menkman, born in 1983, is a Dutch artist, theorist, curator, and visual artist with a focus on glitch art and resolution theory. She is interested in exploring video compression, feedback, and glitches, to create her art. Recently, in September 2019, she was awarded the first residency of Collide International/ Barcelona organized by Arts at CERN in partnership with the City of Barcelona and the Institute of Culture of Barcelona. You can find out more about Rosa Menkman on her website.
Here is a video by Menkman called “Collapse of PAL.”
Jon Satrom
Jon is a Chicago bases artist, educator and self proclaimed "creative problem creator." He's also an incredibly fun and bright person, I know because everything I know about datamosh I learned from him personally while he was a visiting artist/instructor here at CU. Find out more about Jon on his website and SAIC alumni profile video interview.
Brief History of Datamosh
Datamoshing is a form of glitch art that began in the early 2000s motivated by glitches spotted in older digital video codecs like DivX. Pioneering digital artists started using software to hack the code of digital video files by inserting purposeful flaws to generate impressionistic whirls of colorful and psychedelic imagery.
The earliest serious artists to use datatmosh in their work seems to be Owi Mahn and Laura Baginskis with their 2003 video called Pastell Kompressor. They happened upon this technique after detecting errors in some of their video footage.
“Todays video compressors are using an algorithm, which is not anymore saving each frame of a movie clip, but only the changes, which come after a so called "keyframe". If this keyframe is being withdrawn from the compressor, be it on purpose or by chance, chaos is being generated. As basis for "pastell compressor" we have been using time- lapse shootings of clouds drifting by, which we took on the plateaus in the south of france. Afterwards this material has been worked on with a compression codec called "sörensen- 3". This chaotic picture- decomposition, which resulted from the compression, we went on provoking. While doing so, we were joining the fragments together by making another one- frame- animation, which became this movie- clip.” –from the artists Vimeo channel
In the Art World
American contemporary artist Takeshi Murata's video called Monster Movie from 2005 was the piece that really put datamoshing on the art world map. This short film has since become a part of the permanent collection at the Smithsonian.
Mainstream Race
There was a little bit of an unofficial race to see who would use datamoshing in mainsteam media first. Kanye West’s video for "Welcome to Heartbreak," directed by Nabil Elderkin was released on February 17, 2009 ahead of schedule after they realized that another video by the Brooklyn-based electronic group Chairlift was going to use the same technique.
Digital Graffiti
Artists have also used datamosh as a way to comment or perhaps criticize mainstream culture. Matt Caron use datamosh as a form of so-called “digital graffiti,” with his datamoshed Miley Cirus video, which he describes simply as “A datamosh parody of the Wrecking Ball music video.”
This blog will be updated with detailed datamosh instructions by Monday, have a great weekend!
Stealing Vids:
There are many different services to steal videos from online sources, you can google terms like "video grabber," "youtube grabber," "youtube downloader," to find one that works. I have found one for you, here is the link:
BEWARE OF SPAM POP-UPS! Do not interact with any unfamiliar pop-ups, go back to the original window and close any pop ups.
Step 1. -- Find a video on YouTube that you want to datamosh.
Step 2. -- Copy the link to the video

Step 3. -- Paste it into the search bar on the page and hit download. You will likely get a pop up at this point, close the pop up window and return to the original window. Hit download again and wait...

Step 4. -- Click on the download button next to the 720p option.
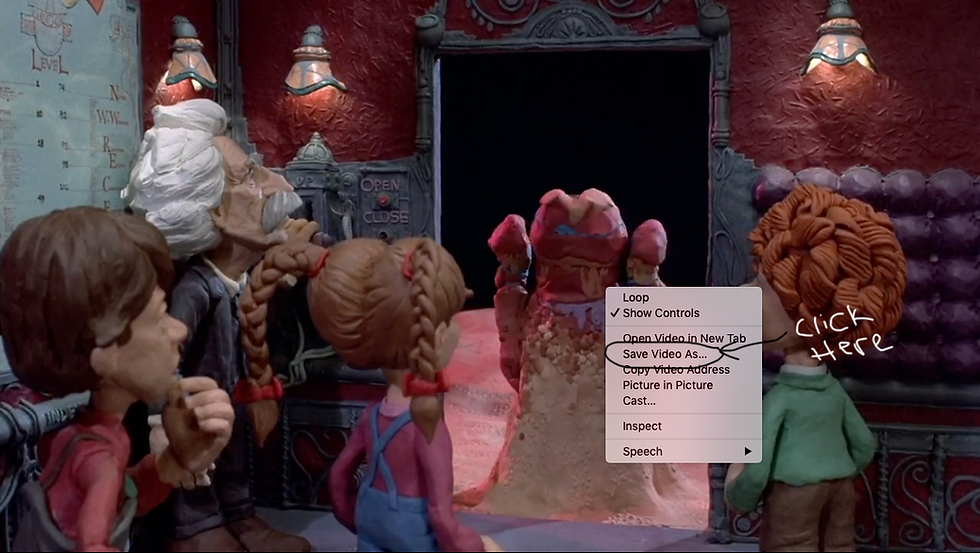
Step 5. -- The video will now open in a new screen, do not fear this pop-up! Right click on the video and click "save video as" and save the video somewhere that will be easy for you to locate (I like to save to my desktop.)
Preparing Vids:
There are different ways to datamosh, some are more intentional using software like After Effects to create purposeful glitch effects, but I’m going to show you the more serendipitous way to datamosh where much of the effect is left to chance.
For this process we will be using an older and fairly clunky video editing software called Avidemux. I wouldn’t personally recommend this software for everyday video editing, but it’s ideal for data moshing because it:
*is open source
*is used for cutting, filtering, encoding
*supports a number of different file types
*is free and works on Windows and Mac
*allows you to distinguish and manipulate specific frame types
This last part is important, and I will get into the details of frame types in the next section.
Our lab (Techne) has Avidemux version 2.7.1 already installed on the Macs. The older version Avidemux 2.5.6 is the recommended version, but 2.7.1 works ok too.
Before we can start to datamosh, we must prepare the videos by re-encoding them. Follow these step-by-step instructions to get your videos ready for glitching!

Step 1. – Go to the search bar at the top right corner of the screen and type in “Avidemux” and open the software.
Step 2. – Once in Avid, go to File > Open and select the video you wish to re-encode.

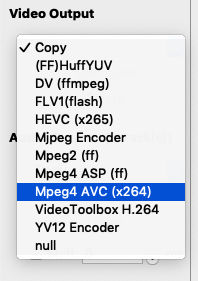
Step 3. – Under “Video Output” choose “Mpeg4 AVC (x264)” from the drop down menu.
Step 4. – Hit the “Configure” button located below “Video Output”, a new window should pop up. Select “Frame” from the menu.
Step 5. – At the top change "configuration" from "custom" to "very fast" In frame, find the “B-frames” section and change “Maximum Consecutive B-frames” to 0.
Then under the “I-frames” section, change “GOP Size Minimum” to 0 and “GOP Size Maximum” to 999. Next hit “OK.”

*In the main window leave “Audio Output” set to “Copy” and “Output Format” set to “Mkv Muxer.”
Step 6. – Finally, go to File > Save and save the file with a new name, like (filename_reencoded.mkv) is helpful. When it is finished saving/re-encoing, go to File > Close and then start the process over with the next video.
*Do this with all of your videos and save the re-encoded videos in a separate folder (always save separate from original files in case the process breaks them so you will have back up files). Now your videos are ready to datamosh!
About frames:
Video files flip through multiple images in sequence in order to create the illusion of motion. However, storing each individual image in a video can eat up a lot of memory making for HUGE files. So the images are compressed into 3 different types of “frames”— I-frames, P-frames, and B-frames.
*I-frames are "intra-coded" frames, also referred to as key frames, which encompass the total picture. They sort of set the stage for a particular video scene and have the most visual information.
*P-frames are “predictive” frames. They don’t contain the full image, they track the change in pixels from the I-frame which causes the illusion of motion between frames. They basically track slight changes from one frame to the next starting with the original I-frame.
*B-frames are “bidirectional predictive frames. They are similar to P frames, with a little more data embedded. They are not necessarily useful for datamosh, so for our purposes we will not be manipulating them.
Datamosh technique #1 Blooming with P frames:
The first technique we will try is known as the “bloom” effect, and is created by duplicating P-frames in a part of the video sequence. Follow these step-by-step instructions to capture this glitch effect in your video:


Step 1. – In Avidemux, close any files that you have open.
Step 2. – Under “Video Output” choose “Copy” from the drop down menu.
Step 3. – Go to File > Open and select one of your re-encoded videos.
Step 4. – Drag the scrubbing tool on the video’s play head to the part of the video where you want the bloom to take effect. I recommend choosing a part of the video where there is a lot of action/motion.
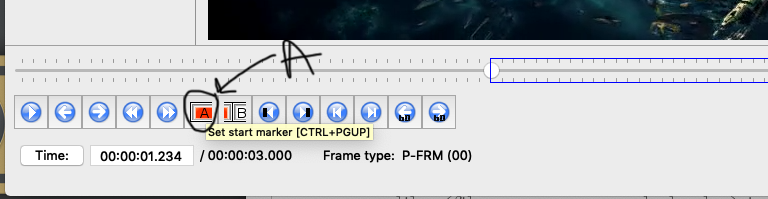
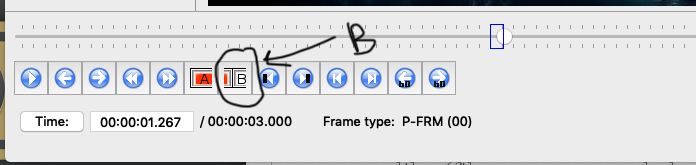
Step 5. – You can use the right/left arrow keys to select a specific frame, make sure that you have selected a P-frame. Once you have selected your frame, hit the “A” button, then move forward 1-3 frames and hit the “B” button. This is how you select specific frames.
Step 6. – Once you have selected 1-3 frames, hit “command + C” on your keyboard to copy the frame(s).

Step 7. – Hit “command + V” on your keyboard to paste the frame(s) into the sequence.
**The software may prompt “The cut points of the pasted video are not on keyframes. Video saved in copy mode will be corrupted at these points.
Proceed anyway?” Click “Yes.”
Repeat multiple times over and over again until you have pasted dozens(ish) duplicated P-frames into your videos sequence.
*If you don’t do enough, the effect will be too brief. If you do too many, you could break the file so that it will no longer work. Try to find the balance.

Step 8. – Next drag the scrubbing tool to the beginning of the video and click “A,” then drag the scrubbing tool to the end of the video and click “B,” this should select the entire video. If the entire video is selected, it should be enclosed in blue ^^ **see photo above.

Step 9. – Go to File > Save and give the file with a new name like “filename_bloom.mkv.”
*Always save your glitches separately with new names so that you can try to glitch your re-encoded files or re-glitch your glitches again and again.

The software may prompt “The video is in copy mode but the cut points are not on keyframes. The video will be saved but there will be corruption at cut point(s). Do you want to continue anyway ?” Click “Yes.”

Step 10. – This software saves your video as an unusual file type. To preview it you should use VLC, a media player that is versatile enough to handle many file types. You will find it already installed on these computers by typing “VLC” in the search bar at the top right corner of your screen (look for the construction cone icon). Open VLC, drag and drop your bloom file into VLC and watch the magic you have just created!
Some tips to try: Try duplicating P-frames in multiple places throughout the video. Try re-glitching a previously glitched file. Experiment with the number of duplicated P-frames. Try new tricks of your own invention to see what will happen. Worst case scenario, you will break the file and have to start over… best case scenario, you will come up with a totally bad ass glitch!
Datamosh technique #2 Moshing with I frames:
The second technique we will try is a standard datamosh effect, and is created by removing I-frames at various parts of the video sequence. Remember I-frames set the stage for any given scene, so without them chaos ensues! Follow these step-by-step instructions to capture this glitch effect in your video:

Step 1. – In Avidemux, close any files that you have open.
Step 2. – Under “Video Output” choose “Copy” from the drop down menu.
Step 3. – Go to File > Open and select one of your re-encoded or previously glitched videos.
Step 4. – Use the scrubbing tool to find an I-frame. *HINT-most frames are P-frames, I-frames are generally at the beginning of a new scene. Use the “up/down” arrow keys on your keyboard to skip all other frames and go directly to the next I-frame.

Step 5. – Once you find an I-frame, select it by click on “A” button, then press “forward arrow” on your keyboard once, and click on the “B” button. This should select only the single I-frame. Once selected, hit “delete” on your keyboard to get rid of the I-frame.
Step 6. – Repeat step 5 until you have gotten rid of all, or some of the I-frames in your video sequence.
Step 7. – Next drag the scrubbing tool to the beginning of the video and click “A,” then drag the scrubbing tool to the end of the video and click “B,” this should select the entire video.

Step 8. – Go to File > Save and give the file with a new name like “filename_datamosh1.mkv.” The software may prompt “The video is in copy mode but the cut points are not on keyframes. The video will be saved but there will be corruption at cut point(s). Do you want to continue anyway ?” Click “Yes.”
*Always save your glitches separately with new names so that you can try to glitch your re-encoded files or re-glitch your glitches again and again.
Step 9. – Drag and drop your datamosh file into VLC and watch the magic you have just created!
Some tips to try: Sometimes deleting the first I-frame with break the file so that it won’t play at all, or may only play a portion of your video. Try removing it, try leaving it, which works best for your file? Try removing some but not all I-frames, try removing all of them. Try new tricks of your own invention to see what will happen. Worst case scenario, you will break the file and have to start over… best case scenario, you will come up with a totally bad ass glitch!
Datamosh technique #3 2 Vid mosh:
The third technique we will try is simply datamoshing 2 or more videos at once to blend them together. Follow these step-by-step instructions to capture this glitch effect in your video:
Step 1. – In Avidemux, close any files that you have open.
Step 2. – Under “Video Output” choose “Copy” from the drop down menu.
Step 3. – The software will only allow you to blend videos that are the same size. You must find 2 same sized videos to make this technique work. Once you have 2 same sized videos, drag and drop them into the software one at a time. They will not be layered on top of one another, but will play sequentially.
Step 4. – Now remove desired I-frames and duplicate desired P-frames as explained in the first two techniques. *HINT – removing the first I-frame from the second video in your sequence will cause the two videos to warp together with a fantastic datamosh aesthetic.
Tip: Experiment, explore, try new things, play, play, PLAY! Datamosh the day away!
Baking the goods:
Once you have made a successful datamosh video that you love (or maybe just like) it’s time to “bake it.” That means to make it permanent in a more standard file type that is easily played on general media players, and is easily sharable. To do this will will simply convert the odd file type “.mkv” into something more familiar such as “.mp4.” Follow these step-by-step instructions to “bake” your video file:
Step 1. – Pick an online browser and go to:

Step 2. – Drag and drop your “.mkv” file onto the green drop box on the website.
Step 3. – Click “Start Conversion” button… wait until your video is done uploading…
Step 4. – Your converted file should start to download on its own, if it does not simply hit the green “download” button when prompted.
Congratulations! Your datamosh video has been baked and is ready to be sent to galleries and museums… or just shared online. ;) Your choice.
Useful Resources:
A go to resource for all things datamosh and general glitch art:
Where to download avidemux version 2.7.1
Where to download VLC player:
Where to convert MKV to MP4
Where to steal vids:
Comments